Benvenuti nella guida illustrata per gli occasionali "non esperti" aggiornatori di Xbox360 Jtag/Rgh. Tutti i frutti :O
Indice:
- 1 Requisiti / Glossario 8 (Da integrare)
- 2 Preparazione dell'ambiente di lavoro PC (OK!!)
- 3 Utilizzo di SIMPLENANDFLASHER, lettura immagine (OK!!)
- 4 Utilizzo di XEBUILDGUI, caricamento immagine, patch e salvataggio immagine aggiornata (OK!)
- 5 OPERAZIONI FINALI scrittura immagine aggiornata su CONSOLE e aggiornamento Avatar (OK!)
- 6 README Ufficiali & Crediti & Fonti (OK!!)
- 7 Domande frequenti (In Attesa...)
Citazione:
Premessa:
Questa guida ha lo scopo di illustrare in pochi ed elementari passaggi come si può effettuare un aggiornamento XeBuild image / freeboot della Vostra console Xbox360 RGH/JTAG all'ultima versione disponibile, utilizzando i comodi "tools" messi a disposizione dal noto coder Swizzy , che ringraziamo sempre, per averci reso le cose "molto facili"! :D
Gli Autori di questa guida illustrata (compresi i fornitori dei software XeBuild, XEBUILDGUI, Simple360NANDFLASHER, declinano QUALSIASI tipo di rivalsa per danni o malfunzionamenti della Vostra console derivati dall'utilizzo delle informazioni qui contenute. L'utente si assume pertanto QUALSIASI RESPONSABILITA' in caso di malfunzionamento della console, legati all'utilizzo delle informazioni riportate (anche solo in parte) in questa guida illustrata.
La Guida Illustrata è stata testata in maniera dettagliata e deve essere letta ed "e"seguita in ogni sua parte.
auspicabilmente seguendo l'ordine numerato dei passaggi, per non incorrere in problemi di aggiornamento del Vostro Kernel freeboot /XeBuild Image.
Allegato 19716
PARTE 1 Requisiti / Glossario
Requisiti: Diamo per scontate le cose fondamentali per portare a termine il lavoro:
- Buona conoscenza ed utilizzo di un Personal Computer, cioè delle periferiche, del sistema operativo Windows e del suo filemanager, dei programmi per modificare i file di testo, opzionalmente è richiesta una conoscenza base per la configurazione di reti LAN, WLAN , client FTP.
- Una console Xbox 360 modificata RGH/JTAG (tutte le revisioni eccetto Winchester ad oggi non glitchabile)
ATTENZIONE!!!ATTENZIONE!!!
Per le console con Nand 4G Bga e-MMC (board Corona 4G) la creazione della XeBuil Image richiede dei passaggi aggiuntivi descritti in seguito, quindi non vi preoccupate.
- Una pendrive USB
Glossario:->XeBuild = In poche parole XeBuld, si potrebbe definire come "un'insieme di script o programmi per patchare il kernel". XeBuild è stato creato "dai più cazzuto Team di Hacker's" in voga, il quale consente (e ci consente :D lol), ad ogni comune mortale, di poter generare un'immagine hack della NXE. !! :DCitazione:
Leggere le definizioni dei vari acronomi ci aiuterà a capire meglio il funzionamento dei programmi e in caso Vi porterà a porre domande con cognizione di causa. (domande? mai più! una volta dato uno sguardo alla parte "Domande Frequenti" alla fine di questa guida, sarete liberi dallo stress di porre domande)
Quindi in parole povere, senza la necessità di avere conoscenze specifiche, anche il nostro fruttivendolo di fiducia sarà in grado di rimuovere alcune limitazioni "di sicurezza" imposte dagli sviluppatori Microsoft, con pochi click del mouse, ed una connessione ad Internet! :) ...Niente di "strano" (al giorno d'oggi) o pericoloso, dunque!
Cliccare sul tasto "SPOILER" per continuare nella visione del Glossario (consigliato):
-> RGH = Reset Glitch Hack. (vedi link)
-> Dashboard = Cruscotto (trad.letteraria), in questo caso si riferisce all'interfaccia per il controllo delle funzioni della console, schermate a video , di contenuti e impostazioni, la dashboard originale microsoft viene abbreviata in NXE.
-> NXE = New Xbox Experience (vedi link)
-> XEX = XEX è il formato di file eseguibile utilizzato dal sistema operativo Xbox 360. Sembra essere un contenitore di crittografia e di pacchetti per PPC.
-> Kernel = Il Kernel di Xbox 360 è responsabile della comunicazione a basso livello di hardware ed altro ancora. Questa è la parte principale di Xbox 360, ad es. I driver per l'accesso alla parte dell'hardware si trovano nel Kernel, insieme con alcuni driver per altre cose utilizzate dal sistema (ad esempio FATX (File Allocation Table per Xbox), STFS (Secure File System transazionale), SFCX (sistema di controllo flash per Xbox). Questa è la parte più interessante della console. Il "cuore" di tutte le funzioni svolte.
È possibile controllare la versione del kernel in "Sistema -> Impostazioni Console -> System Info". La riga in basso contiene la versione del kernel nel formato K: 2.0.nnnnn.0, dove nnnnn è la versione del kernel.
-> Dashlaunch = Lancio Dash, è un software sviluppato dal noto "cOz" che permette di avviare una Dashboard alternativa alla NXE tramite patch alla immagine XeBuild/freeboot, fondamentali per il funzionamento di alcuni XBLA, della rete LiNK, ecc. Per i dettagli riguardanti DashLaunch, ovviamente consiglio la Visione della Guida Dashlaunch per Principi e Principianti.
-> LAUNCH.INI = File di configurazione di DashLaunch. (D.L.) Contiene tutti i parametri accessibili dalla interfaccia grafica di D.L. INSTALLER. E'un semplice file di testo, può essere modificato con un editor tipo NOTEPAD e viene posizionato nella radice dei dispositivi (es. HDD1:launch.ini)
-> PATCH = Attraverso il cracking, il cracker bypassa le limitazioni della versione protetta del programma e ne ottiene una perfettamente funzionante con funzioni aggiuntive "non disponibili in origine" .
Fortunatamente in questa guida ci concentreremo esclusivamnete sull'utilizzo di XEBUILDGUI ed SIMPLE360NANDFLASHER di Swizzy, :) con qualche accenno al launch.ini... ma minimo eh!!
Allegato 19716
PARTE 2: Preparazione dell'ambiente di lavoro PC
Bene, spero che siate pronti per iniziare, da questo momento, seguendo i brevi passaggi descritti di seguito, predisponiamo un qualsiasi pc windows per lavorare con i file di immagine e cpukey che ricaverete dalla console stessa. E quindi portare a termine un aggiornamento del kernel freeboot / XeBuild image /Avatar bla bla.
2.1: Procediamo velocemente allo scaricamento dei due pacchetti essenziali:
Simple 360 nand flasher BETA Cliccare sull'ultima versione disponibile per avviare lo scaricamento del pacchetto.
XEBUILDGUI Cliccare sull'ultima versione disponibile per avviare lo scaricamento del pacchetto.
Allegato 19673
Dopo aver scaricato i due pacchetti nel Vostro PC si procede alla decompressione degli archivi:
Decomprimiamo quindi, sul Desktop o dove preferite;
- il Default.xex di SIMPLE360NANDFLASHER
- e l'intero pacchetto XEBUILDGUI in una cartella che chiameremo XeBuildGui;
Allegato 19674
Se non disponete di un decompressore, consiglio l'utilizzo di 7-Zip Filemanager (Free)
2.2: Inserite la periferica usb in una porta usb libera del PC;
Allegato 19675
2.3: Avviamo il programma....
Per eseguire XEBUILDGUI è necessario che il pc disponga del .NET framework 2.0 o superiori (Windows XP) , tutti gli altri felloni non dovrebbero riscontrare problemi di framework.
Allegato 19676
2.4: Dalla schermata principale , cominciamo con la preparazione dei file seguendo i 4 passaggi illustrati di seguito:
Allegato 19677
Facendo delle prove è anche andato in errore perchè non ero connesso ad Allegato 19703
quindi assicuratevi di esserlo voi, occasionali utenti, quando "eseguide" questa guida :D (LOL) la prima volta.
Questo anche per farvi notare che XEBUILDGUI utilizza le librerie messe a disposizione da un fantastico progetto , il GXArena FW Repo!
Allegato 19702
Che mi stava per sfuggire! Penso sia anche gradito un doveroso ringraziamento ai ragazzi che gestiscono questo GXArena server ;) BENE!
Mentre attendete il download dell'Avatar Update/Dashfiles, approfittate di questi minuti/secondi e procedete alla configurazione della pendrive usb con SIMPLE360NANDFLASHER, soffermiamoci dunque un minuto esatto, sull'utilizzo del suo file di configurazione per automatizzare il processo di lettura e scrittura (successiva), visto che siamo ancora al PC!!!
2-5: Trovate un'angolo libero del Desktop e procedete con Clic di destra > Nuovo > Documento di testo semplice, rinominandolo simpleflasher.cmd;
Allegato 19678
Procedere editatando il file, cioè aggiungendo UNA semplice parola che definisce il comando che dovrà eseguire il programma in modalità automatica ;
Allegato 19729Codice:read
Successivamente inviamo il file nella vostra unità di memoria USB come illustrato di seguito:
Allegato 19680
E con la stessa procedura inviamo ANCHE il Default.xex (decompresso in precedenza da "qualche parte") di SIMPLE360NANDFLASHER alla unità di memoria USB, in modo da ritrovarci i due file nella radice della periferica come si vede di seguito:
2.6: Assicuratevi di avere una situazione del genere, con il Default.xex e il simpleflash.cmd nella radice della vostra unità removibile, prima di procedere alla "rimozione sicura":
Allegato 19708
Bene bene, bene! Un paio di passaggi ed avremo tutti i dati necessari per procedere alla creazione dell'immagine XeBuild Freeboot! Seguite attentamente le indicazioni illustrate di seguito, SIMPLE360NANDFLASHER non necessita di nessuna particolare azione se non quella ovvia di essere avviato a console accesa, tramite il vostro filemanager preferito. Di seguito nel dettaglio:
3.1: Passiamo alla console XBOX360 accesa e dal filemanager accediamo all'unità USB0:/ ,
(dopo averla inserita in una porta usb disponibile,naturalmente).
Si procede dunque avviando il Default.xex, di seguito una rapida illustrazione "one shot" dei passaggi necessari all'avvio utilizzando i filemanager incorporati in Freestyle ed Aurora. I passaggi sono numerati e nei riquadri è evidenziata l'azione da compiere.
Freestyle Filemanager>Allegato 19684
Aurora Filemanager>Allegato 19685
Dopo l'avvio del Default.xex di Simple360NandFlasher, come vedrete a video, una schermata Vi informerà sull'andamento delle operazioni di lettura della vostra nand,(qualsiasi essa sia).
Automaticamente il programma rileva il tipo di console ed effettua le operazioni necessarie, come da esempio qui di seguito quotato e spoilerato, il logfile delle operazioni svolte !
Simple 360 NAND Flasher.log (Trinity) AUTO MODE , lettura automatica della nand.
Citazione:
Simple 360 NAND Flasher by Swizzy v1.4b (BETA)
* Detecting NAND Type...
* Detected RAW NAND device!
* Entering NAND Mode...
* Attempting to grab CPUKey...
* CPUKey sucessfully saved to: game:\cpukey.txt
============= Console information: =============
Current Dashboard: 2.0.*****.0 "La versione di dashboard NXE attuale"
Current DashLaunch version: 3.** (***) "La versione di Dashlaunch attuale"
Your CPUKey is: "La mia cpu key"
================================================
* Looking for simpleflasher.cmd for automatic features...
game:\simpleflasher.cmd Found!
* Entering Automatic mode!
* AutoDump command found!
* Executing command!
config register = 231D4
sfc: page_sz = 200
sfc: meta_sz = 10
sfc: page_sz_phys = 210
sfc: pages_in_block = 20
sfc: block_sz = 4000
sfc: block_sz_phys = 4200
sfc: size_mb = 16MB
sfc: size_bytes = 1000000
sfc: size_bytes_phys = 1080000
sfc: size_pages = 8000
sfc: size_blocks = 400
* rawdump v1 started (by Swizzy)
game:\flashdmp.bin opened OK, attempting to read 0x1080000 bytes from flash...
NAND Dumped! :D
Completed after 35.00 seconds
Calculating CRC32 for: game:\flashdmp.bin
Calculated CRC32 value: 345C986B
* Attempting to save the CRC32 value to game:\flashdmp.crc32...
* Sucessfully saved the CRC32 value!
PROMEMORIA-3.2 Conclusa questa all'apparenza "banale" operazione dunque, e il Vostro dump è regolare,in accordo con i file di log precedentemente spoilerati il programma si chiuderà e verrete riportati alla vostra dashboard di default.Citazione:
Dateci uno sguardo ai messaggi di log!! Nel mio caso finisce tutto bene , ma ad un occasionale utente l'aggiornamento fallisce più di quanto non si immagini, soprattutto in certi periodi dell'anno come questo...
!!!ATTENZIONE!!! Come anticipato nei requisiti alla PARTE 1, se vi ritrovate una console con memoria nand 4G BGA e-MMC
Dovrete eseguire dei passaggi aggiuntivi nel momento della creazione della XeBuild Image come vedremo a breve nella parte "4.3.B CORONA 4G"
Riporto ad esempio il Simple 360 NAND Flasher.log (Corona 4G) AUTO MODE , lettura automatica della nand su Corona 4G.
Citazione:
Log file da aggiungere
Opzionalmente se l'utente occasionale ignora il funzionamento del file launch.ini , è raccomandato effettuare una copia dello stesso su USB0 utilizzando il filemanager della vostra dashboard!!
Questo file è facilmente rintracciabile dato che deve essere presente nella radice del "dispositivo". Come descritto da c0z nel file info_launch.ini.Ad oggi i dispositivi supportati nella console sono i seguenti:
Tipo di dispositivo Percorso Disco rigido interno Hdd:\ Periferica di memoria rimovibile Usb:\ (Usb0:\) Unità di memoria (porta M.U. Phat) Mu:\ Unità di memoria USB UsbMu:\ Unità di memoria su NAND big block (Phat) FlashMu:\ Unità di memoria 4G interna (Slim) IntMu:\ Unità di memoria 4G BGA e-MMC (Slim Corona) MmcMu:\ CD/DVD Dvd:\
(Opzionale consigliato)
3.3 Ricapitolando, una volta localizzato il file launch.ini procediamo ad effettuarne una copia su USB0 come illustrato sotto spoiler a seconda del filemanager che vorrete utilizzare:
Aurora Filemanager
Freestyle Filemanager
Tutto fatto???
Bravi bambiniiiii!! Passiamo nuovamente al PC dopo aver rimosso la periferica di memoria USB dalla console e proseguiamo nella parte 4.
Allegato 19716
PARTE 4: Utilizzo di XEBUILDGUI, caricamento immagine, patch e salvataggio immagine aggiornata su USB
Bene,bene,bene,bene. Eccoci giunti alla parte più "succulenta" prestate attenzione alle illustrazioni, e la vostra immagine XeBuild sarà pronta in 30 secondi! (Circa)
Questa immagine rappresenta una panoramica dei passaggi (numerati) da seguire per creare la Vostra immagine XeBuild di aggiornamento all'ultima versione di dashboard NXE / Kernel disponibile;
Allegato 19693
Di seguito spoilerati, i passaggi nello specifico:
4.0 Inseriamo l'unità rimovibile usb che contiene il dump, nella solita porta usb del PC Ovviamente!.
4.1 Ora avremo altri file nella memoria:
Allegato 19688
!!!ATTENZIONE!!! : Simple360NandFlasher consente il recupero automatico della cpukey unitamente alle versioni compatibili di Dashlaunch.
Nel malaugurato caso che il file cpukey.txt sia assente , procedete al recupero manuale della cpukey tramite Xell! Oppure installate l'ultima versione di Dashlaunch disponibile, e ripetete il dump in modo da ottenere anche il file cpukey.txt!!!
(Come di seguito descritto sotto spoiler al punto 4.4 un rapido elenco descrittivo dei passaggi necessari per risolvere questo piccolo contrattempo)
Promemoria:4.2 Procediamo alla copia del $SystemUpdate scaricato in precedenza, cliccando sul pulsante "Prepare drive" previa selezione dell'unità USB removibile corrente:Citazione:
Abbiamo salvato il file launch.ini su usb? In questo caso assicuratevi di caricare la configurazione in memoria, utilizzando il Dashlaunch.ini editor, illustrato in figura!
Allegato 19692
Questa operazione vi risparmierà molte imprecazioni al riavvio successivo dopo aver effettuato l'aggiornamento, quindi è consigliabile seguire anche questo passaggio.
Allegato 19689
4,3 Passiamo al caricamento dell'immagine flashdmp.bin, e di seguito alla definizione del percorso di salvataggio, che sarà ovviamente la vostra unità removibile, ma con un piccolo accorgimento, creare una cartella dove verrà memorizzato il file di aggiornamento:
Allegato 19730
4.3.B CORONA 4G : Se il vostro flashdmp.bin ha un peso di 48MB cioè equivale ad dump e-MMC CORONA 4G , seguite i passaggi spoilerati di seguito per generare la vostra XeBuild Image:
Seguire i passaggi numerati illustrati di seguito ed ignorare i messaggi di avviso confermando la Vostra scelta:
Allegato 19734
4.3.B.1 / Configurare XEBUILDGUI in "Advanced Mode"(1) + "Enable Failsafe"(2)
4.3.B.2 / Caricare l'immagine (3) se non l'avete già caricata, come illustrato al passo 4.3
4.3.B.3 / Caricare la cpukey come illustrato al passo 4.4
4.3.B.4 / L'interfaccia cambierà mostrando nuove opzioni, abilitate la casella di controllo "Open parameter/Argument editor prior to starting XeBuild/Python" (4)
4.3.B.5 / Cliccare sul pulsante "Generate Xebuild Image" (5)
Allegato 19735
In questo quadro si imposta il parametro "corona4g" al posto di "corona" di seguito;
4.3.B.6 / Confermare la Vostra scelta (1)
4.3.B.7 / Aggiungere o modificare il parametro in accordo con il tipo di build che ci interessa generare, cioè "corona4g"
4.3.B.8 / Confermare l'esecuzione del comando.
Allegato 19736
Questo sarà il quadro di riepilogo che vi troverete una volta terminate le operazioni, verificate le Vostre impostazioni che devono coincidere con quelle nei riquadri rossi :D come illustrato!
PROSEGUIRE QUINDI AL PASSO 4.6 SALTANDO I SUCCESSIVI
4.4 Ora carichiamo la CPUKEY andando a leggere il file cpukey.txt:
Allegato 19691
OPPURE eseguite uno dei tre metodi opzionali se non disponete del file come detto in precedenza, i tre metodi sono di seguito:
4.4.1 Ottenimento Manuale (tramite lettura cpukey a video)
- 4.4.1.1 Spegnete la console Xbox360.
- 4.4.1.2 Accendete la console premendo il tasto di espulsione del disco (EJECT)
- 4.4.1.3 Attendere l'avvio di Xell, Trascrivete la Vostra Cpukey in modo da poterla inserire in XEBUILDGUI :Allegato 19721
- 4.4.1.4 Spegnete la console.
4.4.2 Ottenimento Automatico (usando cavo ethernet : console con cavo in LAN/ROUTER o collegata al pc direttamente)
- 4.4.2.1 Spegnete la console Xbox360.
- 4.4.2.2 Collegate un cavo ethernet alla presa RJ45 della console Xbox360. ed;
al Vostro Router/Switch (alternativa A)
alla Vostra presa RJ45 ethernet presente sul PC. (alternativa B)- 4.4.2.3.A Proseguite al passo 4.4.2.4 !
- 4.4.2.3.B Impostare nelle proprietà del Vostro adattatore di rete sul PC un indirizzo IP statico a 192.168.1.100 con NETMASK 255.255.255.0 SENZA GATEWAY O DNS (non necessari).
- 4.4.2.4 Accendete la console premendo il tasto di espulsione del disco. (EJECT)
- 4.4.2.5 Attendere l'avvio di Xell, e l'ottenimento dell'indirizzo IP da DHCP (alternativa A) ,come si vede dal log sottoriportato:
XeLL - Xenon linux loader second stage v0.993-git-7466b6d 2013-08-27 (LibXenon.org)prendete nota dell'indirizzo IP assegnato dal server DHCP.
Special Corona Compatible XeLL version
* nand init
* network init
* initializing lwip 1.4.0...
Reinit PHY...
Waiting for link...link up!
* requesting dhcp.....success
SE alla fine del caricamento viene riportato l'indirizzo IP 192.168.1.99 significa che nessun server DHCP è disponibile in rete e probabilmente:
--> avete optato per l'alternativa B con collegamaento P2P. (Vedi 4.4.2.6.B)
--> esiste un problema fisico di collegamento al Router/Switch. (Sostituite il cavo di rete (va bene qualsiasi tipo di cavo ethernet cat.5 o superiore)
--> la vostra rete non dispone di un server DHCP attivo. (Passate ad impostare un IP manuale 4.4.2.3.B)- 4.4.2.6.A Passare a XEBUILDGUI ed inserite l'indirizzo IP ottenuto dal DHCP nel campo "IP to Xell". Allegato 19722
Citazione:
Opzionalmente potete recuperare il Vostro IP Xell dalla lan senza collegamento al televisore usando FING (app da smartphone) o questa rapida procedura universale: (spoilerata)
PER visualizzare gli indirizzi IP attivi sulla Vostra rete:
(ovviamente non sto ad elencare tutti i metodi per recuperare un indirizzo IP altrimenti servirebbe un tutorial a parte, cazzotti.)
Dal menu Start di windows eseguire CMD (il prompt dei comandi)
incollare la riga seguente avendo cura di sostituire il valore 10.10.10. nel valore riportato da XEBUILDGUI cliccando il pulsante "Get base IP"
Tutti i pc presenti in rete risponderanno e di conseguenza e verrà creato un'elenco nella finestra del prompt, XBOX360 con xell attivo compresa!!Codice:FOR /L %i in (1,1,255) do @ping -n 1 10.10.10.%i | find "TTL="
Allegato 19723
- 4.4.2.6.B Passare a XEBUILDGUI ed inserite 192.168.1.99 nel campo "IP to Xell" Allegato 19724
- 4.4.2.7 Cliccate sul pulsante "Get Cpukey"
4.4.3 Ottenimento Automatico (tramite aggiornamento Dashlaunch e riavvio di Simple360NANDFLASHER)
- 4.4.3.1 Scaricare il pacchetto Dashlaunch 3.15 e decomprimerlo direttamente nella periferica rimovibile USB
- 4.4.3.2 Estrarre in sicurezza la periferica dal PC ed inserirla nella console accesa
- 4.4.3.3 Attraverso l'uso del vostro filemanager Freestyle/Aurora/XexMenu, localizzate la periferica USB0 ed avviate il Default.xex presente nella cartella INSTALLER.
- 4.4.3.4 Se la vostra versione di Dashlaunch è obsoleta vi verrà proposto di aggiornare le patch, operazione necessaria per il recupero automatico della CPUKEY da parte di Simple360NANDFLASHER, quindi accettare la richiesta di aggiornamento senza nessuna preoccupazione.
Per maggiori informazioni riguardo l'utilizzo di Dashlaunch potete consultare la guida illustrata specifica
http://www.consoleopen.com/forum/tut...ncipianti.html
Tutto è stato fatto senza errori?? Avremo dunque i dati del keyvault decriptati e visibili nei vari campi, come illustrato in figura nel riquadro "Motherboard Information"
e lo stato di tutti i checkbox al riquadro 5 sarà OK!
Allegato 19697
!!!!! ATTENZIONE!!!!! !!!!! ATTENZIONE!!!!! Prestare massima attenzione al tipo di BUILD che si andrà a creare selezionando correttamente l'opzione al riquadro 2. Una errata selezione del tipo di BUILD causerà inevitabilmente dei problemi di avvio, dopo l'aggiornamento.
Quindi se si ignora questa informazione, per conoscere il tipo di BUILD con certezza è necessario avviare Dashlaunch INSTALLER sulla console, prima di aggiornare! l'informazione verrà riportata nell'angolo in basso a destra della schermata iniziale.
!!!!! ATTENZIONE!!!!! !!!!! ATTENZIONE!!!!!
Allegato 19698
Consiglio>>Citazione:
Se non si sa come avviare Dashlaunch INSTALLER
fate riferimento alla procedura al passo 4.4.3 per avviare velocemente il programma e recuperare l'informazione necessaria. Quando vi si presenterà la schermata principale di Dashlaunch INSTALLER, prendete nota della BUILD
Dashlaunch INSTALLER XEBUILDGUI Glitch RGH1 Glitch2 RGH2 Jtag JTAG
Bene spero di essere stato abbastanza chiaro! procediamo nella guida con una rapida carrellata delle operazioni per finalizzare la creazione di XeBuild Image:
4.5 Per impostazione predefinita le voci al riquadro 3 sono quelle qui visibili che consiglio di mantenere se non se ne conosce il significato:
Allegato 19699
4.5.1 Cliccare sul pulsante indicato dalla freccia al quadro 4 per generare l'immagine hack XeBuild: (Grazie Swizzy :D )
Allegato 19700
4.5.2 Terminato il procedimento potete confermare la chiusura dell'app XEBUILDGUI:
Allegato 19694
4.5.3 Ora troverete nuovi file nella vostra unità removibile, nella vostra cartella SIMPLE360NANDFLASHER:
Allegato 19725
4.6 Generazione file CRC32 per flash !
Di seguito vediamo come creare un file updflash.crc32, questo file si rende necessario unitamente all'utilizzo del file simpleflasher.cmd per consentire alla procedura automatica di Simple360NandFlasher di essere portata a termine in sicurezza ed esente da ogni possibile tipo di errore nella struttura della immagine updflash.bin.
4.6.1 Scarichiamo il tool CRC32Gen, gentilmente messo a disposizione da Swizzy in persona :) per questa guida illustrata e decomprimiamo direttamente nell'unità di memoria removibile , all'interno della cartella "simple360nandflasher" assieme al CRC32Gen vi ritroverete anche i file sorgente. (Questo software è stato testato per l'utilizzo con file di immagine fino a 48 MB !)
4.6.2 Create un collegamento al file CRC32Gen.exe ...
Allegato 19726
4.6.3 Selezionando le proprietà del collegamento , si apre la finestra di riepilogo "Proprietà" e nel campo "Destinazione"
Aggiungiamo la parola updflash.bin alla fine della stringa nel campo come illustrato.
Allegato 19727
Salvare ed eseguire il collegamento per generare automaticamente un file checksum "updflash.crc32"
4.7 Il ritorno di simpleflasher.cmd
Non scordiamoci di procedere NUOVAMENTE alla modifica rapida del file simpleflash.cmd inserendo come riportato in questa stringa il comando di scrittura della immagine XeBuild/Freeboot...
Allegato 19731
4.8 Salvare simpleflasher.cmd ed inviare alla unità USB, MA questa volta spostate il file nella cartella specifica assieme al file Default.xex !!Codice:write
Allegato 19732
4.9 Layout finale di tutti i file necessari per l'aggiornamento automatico dell'immagine XeBuild / Freeboot.
Allegato 19728
Ed ovviamente la cartella $SystemUpdate nella radice del dispositivo già presente (passo 4.2)
Allegato 19716
PARTE 5: OPERAZIONI FINALI scrittura immagine aggiornata su CONSOLE e aggiornamento Avatar
Ecco, finalmente possiamo flashare questo aggiornamento nella console! ERA ORA! :D
Siete passati alla console lasciata accesa, due minuti fa (il tempo di leggere ed attuare la PARTE 4 poi)
Avete la schermata del Vostro filemanager con la vostra unità USB rimovibile inserita, dopo averla rimossa in sicurezza dal PC, senza che dovessi ripetervelo per l'ennesima volta??? BENE!!
Per l'avvio del SIMPLE360NANDFLASHER, ormai non avrete più indecisioni sul come fare, ora che conoscete il filemanager Freestyle/Aurora , ripetete i passaggi illustrati della parte 3 per avviare l'aggiornamento. tenendo conto che ora troverete il programma dentro la cartella che avete creato. (cioè simple360nandflasher)
Questa operazione, molto importante, infatti evita di far avviare il default.xex automaticamente dopo l'aggiornamento risparmiandoci qualche problemino di incompatibilità!
Rimanete a guardare :O mentre il software procede con l'aggiornamento e la console si riavvierà!
Simple 360 NAND Flasher.log (Trinity AUTO MODE (MODO AUTOMATICO DI SCRITTURA XeBuild Image)
Citazione:
Simple 360 NAND Flasher by Swizzy v1.4b (BETA)
* Detecting NAND Type...
* Detected RAW NAND device!
* Entering NAND Mode...
* Attempting to grab CPUKey...
* CPUKey sucessfully saved to: game:\cpukey.txt
============= Console information: =============
Current Dashboard: 2.0.xxxxx.0 La Vostra versione di dashboard
Current DashLaunch version: 3.xx (xxx) La Vostra versione di Dashlaunch
Your CPUKey is: La Vostra CpuKey
================================================
* Looking for simpleflasher.cmd for automatic features...
game:\simpleflasher.cmd Found!
* Entering Automatic mode!
* AutoFlash command found!
* Looking for game:\updflash.crc32... Found!
* Checking CRC32 Hash...
* Checking game:\updflash.bin Crc32:
Calculated value: 273CD95E
Expected value: 273CD95E
Executing command in 5 seconds
Executing command in 4 seconds
Executing command in 3 seconds
Executing command in 2 seconds
Executing command in 1 seconds
Executing command!
WARNING! DO NOT TOUCH YOUR CONSOLE OR CONTROLLER DURING THE FLASH PROCESS!!
The console will reboot when it's done!
Checking game:\updflash.bin for spare data... Spare data detected!
config register = 231D4
sfc: page_sz = 200
sfc: meta_sz = 10
sfc: page_sz_phys = 210
sfc: pages_in_block = 20
sfc: block_sz = 4000
sfc: block_sz_phys = 4200
sfc: size_mb = 16MB
sfc: size_bytes = 1000000
sfc: size_bytes_phys = 1080000
sfc: size_pages = 8000
sfc: size_blocks = 400
* rawflash v5 started (by cOz, modified By Swizzy)
game:\updflash.bin opened OK, attempting to write 0x1080000 bytes to flash...
image written :D
Completed after 23.00 seconds
Rebooting in 5....4....3....2....1....BYE!
Simple 360 NAND Flasher.log (Trinity MANUAL MODE (MODO MANUALE DI SCRITTURA XeBuild Image)
Citazione:
* Detecting NAND Type...
* Detected RAW NAND device!
* Entering NAND Mode...
* Attempting to grab CPUKey...
* CPUKey sucessfully saved to: game:\cpukey.txt
============= Console information: =============
Current Dashboard: 2.0.17349.0
Current DashLaunch version: 3.15 (574)
Your CPUKey is:
================================================
* Looking for simpleflasher.cmd for automatic features...
game:\simpleflasher.cmd NOT Found!
* Entering Manual mode!
Press A if you want to flash your nand with Rawflash v5
Press B if you want to safeflash your nand with Rawflash v5 (Dump + Write)
Press X if you want to dump your nand with Rawdump v1
If you press anything else the application will close...
Press Start to flash your nand or press anything else to exit!
WARNING! DO NOT TOUCH YOUR CONSOLE OR CONTROLLER DURING THE FLASH PROCESS!!
The console will reboot when it's done!
Checking game:\updflash.bin for spare data... Spare data detected!
config register = 231D4
sfc: Page_sz = 200
sfc:: meta_sz = 10
sfc[: Page_sz_phys = 210
sfc[: Pages_in_block = 20
sfc: block_sz = 4000
sfc: block_sz_phys = 4200
sfc: size_mb = 16MB
sfc: size_bytes = 1000000
sfc: size_bytes_phys = 1080000
sfc: size_pages = 8000
sfc: size_blocks = 400
* rawflash v5 started (by cOz, modified By Swizzy)
game:\updflash.bin opened OK, attempting to write 0x1080000 bytes to flash...
image written :D
Completed after 25.00 seconds
Rebooting in 5....4....3....2....1....BYE!
Bene bene! Abbiamo una console aggiornata ora ,solo a livello di kernel. :??
Per terminare l'aggiornamento si procede avviando un .xex qualsiasi dal filemanager o un gioco magari?
Immagino di si!!!! Ho un dubbio, ed il mio occhio stanco ;) si posa su un pulsante ...Ooooh! :D
Allegato 19696
Almeno da quello che si legge sul tutorial nel forum ufficiale (In Inglese):
Dalla dashboard 2.0.16197.0 e superiori, è necessario avviare "qualcosa" per far apparire la notifica, (quindi dimenticate gli aggiornamenti spontanei)
inserendo semplicemente la pendrive con il $SystemUpdate nella console, non accadrà un bel cazzotti di niente!
Gli avatar update automatici tramite USB non esistono più da un pezzo.
La finestra di aggiornamento finale compare dopo aver avviato un'eseguibile dunque, potremmo avviare XexMenu, Dashlaunch Installer , ecc e subito dopo appare la finestra di aggiornamento, ovviamente non dovete togliere la periferica usb dalla console, "finquando non ve lo dirò io!" Hahah.
(Cit.Silvan il Mago)
Dopo aver acconsentito partirà la copia dei file nelle aree riservate (HDD o M.U.) agli aggiornamenti Avatar ecc.. ed un secondo riavvio, quindi la console sarà perfettamente pronta all'uso!!
Verificate a Vostra scelta la versione del kernel da Freestyle/Aurora/Dashlaunch Installer e la presenza del vostro Avatar (che non deve essere grigio, se ci siamo capiti), altrimenti tornate subito a giocare!!
ORA potete rimuovere la periferica usb dalla console.
Leggere i readme ufficiali è sempre una buona norma, e all'interno dei pacchetti XEBUILDGUI & SIMPLE360NANDFLASHER di Swizzy troverete sempre un file README e/o CHANGELOG, di seguito i rispettivi "spoilerati" .
Swizzy's SIMPLE360NANDFLASHER Version 1.4bCitazione:
Simple 360 NAND Flasher By Swizzy v1.4b (BETA)
**********************************************
** Please note that this is an open BETA, it have been tested by me and a few friends, but... i don't take any
responsibility for possible bricks, make sure you understand this before you use this new version! **
****************
* Requirements *
****************
- A Hacked Xbox 360 (JTAG/RGH or similar)
- A nand dump to write or just enough space to save your nanddump on whatever device you use this app on
** For AutoMode: **
- A CRC32 hash of updflash.bin (in file updflash.crc32)
- A File named "simpleflasher.cmd" containing a command described in the secton "AutoMode" below
****************
* What it does *
****************
- It'll flash your motherboards nand with the supplied image (updflash.bin) using rawflash v4 or rawflash4g v1
- It'll dump your motherboards nand with to flashdmp.bin using rawdump v1 or rawdump4g v1
************
* AutoMode *
************
Below is a list of commands followed by an explanation of what it does:
read - Dumps nand to flashdmp.bin and generates a CRC32 hash in flashdmp.crc32
dump - ^ same as above
write - Writes updflash.bin to nand (if CRC32 hash matches)
flash - ^ same as above
safe - Safeflash (dump + write) requires CRC32 hash like write, but dumps to recovery.bin instead
exit - Just exit the app, mainly meant for just extracting CPUKey...
reboot - Reboots the whole console, mainly meant for FSD plugin updates
In order for these features to actually work you have to write any of the above keywords/commands in a file called "simpleflasher.cmd"
This file is read on launch and deleted once read (NOTE: It'll ONLY read 1 line!)
*********************
* CPUKey Extraction *
*********************
It's finally here, i could've had it working a long time ago, i just didn't get the test app working... and decided to put it aside for a while...
This feature requires that you have dashlaunch 3.01 or later installed, if you don't it'll warn you about it...
***********
* Credits *
***********
- cOz Thanks for all the help you constantly give me with just about everything, and thanks for rawflash! :D
- Thanks to xvistaman for helping me solve that one last error i had with corona4g writes! i owe you ;)
- Thanks to blaKcat for listening to me about security stuff, CRC32 hashes etc. and not releasing the modified version before my official one ;)
- Thanks to everyone that has helped me test it!: Jonblu @ Consoleopen, Sileandro and Razkar And others that i don't know the name of...
- Thanks also goes to who ever it was that ported rawflash to SDK in the first place and making it open source!
- Thanks also to everyone that reports bugs and/or errors in ALL my apps :)
*******************
* Future features *
*******************
- Standalone Network controls (AutoMode was designed for AutoGG's network updates and requires FTP access with App Execution)
*************
* Changelog *
*************
v1.4b (BETA)
- Fixed: It'll now properly show you when it detected a bad block that could not be recovered, if it could be recovered it'll mention that aswell
- Fixed: Some output on screen wasn't saved to the log (apart from the progress indication which is quite useless)
- Fixed: Some messages would be added after the progress indication while in NAND mode instead of overwriting the progress indication (it's now shown correctly and logged!)
v1.4 (BETA)
- Changed: CPUKey Extraction now also works with Dashlaunch 3.08 and later
- Changed: The message shown when CPUKey Extraction fails nolonger mentions old dashboards, but instead mentions incompatible Dashlaunch version...
- Changed: Rawflash now tries to recover from a previous badflash (it erases each block and checks it again before thinking of it as bad...)
- Added: It'll now also show you the currently running Dashlaunch version (if there is one running)
v1.3 (BETA)
- Added: Auto/Manual mode, it can now do things straight away rather then waiting for user input...
- Added: CPUKey Extraction this is done before it asks what to do, or even reads automode files...
- Added: It'll display the currently running dashboard version for you (Useful when dumping/updating to see what's running atm)
- Fixed: Output log will nolonger include anything that starts with "\r" meaning anything that reports status...
- Changed: Changed the text color to gold (0xFFFFD700)
- Changed: Font size is now smaller, and i've changed the font from Verdana to X360 by Redge
- Changed: The console will now hard-reset itself rather then power off (same way as a normal Xbox 360 update do)
- Changed: It'll now clear the screen before it starts reading/writing, giving you a more clear picture of what's going on ;)
v1.2
- Added: Full support for Corona v2 (4GB Corona)
- Added: Auto Detect which mode to run in (it'll autodetect if you are running on a MMC type of machine or a RAW type [MMC type = Corona 4GB/V2, RAW = any other older machine])
- Added: Safe-Flash (Read to recovery.bin then write)
- Added: Autoshutdown after flash (it'll tell you it's shutting down then count down starting at 5 seconds...)
- Added: It'll turn off your wireless controllers during flash to keep you safe (if you reconnect them they'll be shut off again while it's working)
- Fixed: If you accidently hit eject the app now stays running! :D
- Fixed: You no longer see the options to write if you don't have a updflash.bin next to the app...
- Fixed: Lot's of code cleanup, making it look nicer and easier to follow/understand :)
- Added: It'll now also check for Spare data before writing, again it's a safety measure, if it finds spare data while in MMC mode it'll warn you about it and give you the option to exit... and of course the other way around for raw mode...
- Added: The above check for spare also checks for the "Magic bytes" (your Xbox 360 image should start with 0xFF4F, i've never seen an image that differ from this, and thus it's an easy way for me to check that the file you give the app really is a nand...)
- Fixed: The app will now clear the line of output before it starts overwriting, this means that you'll no longer see leftover output on screen from previous output ;) (mostly for error messages during progress output)
- Changed: The app now use a different font (it used Arial before, now it uses verdana)
** WARNING!! If you don't let the app exit after flashing a corona v2 you will most likely end up with a machine that no longer boots untill you reflash it using a computer!! You've been warned... **
** Altought this version adds multipile security checks before it starts writing an image to your nand it can still be very dangerous... if you don't know what you are doing, don't do it! ;) **
v1.1
- Added: Now able to dump your nand
- Added: Now also writes a log of whatever output it gave to you on screen (except for current progress output)
- Added: Timer, it now checks and tell you how long it took to perform the task (in seconds... if there is more then 60, you'll have to calculate on your own how many minutes and so on it took ;))
- Fixed: Now properly turns of when you've flashed your NAND
** A Little word of warning: DO NOT exit the app after flashing... turn of your console after flashing it!! or you'll not be particularly happy with what you see ;) **
v1.0
- Initial release, Just a quick mod of the previously released "nandflasher_xex" to fix output issue/problem and make it slightly more "safe" by requiring input from you...
Swizzy's xeBuild GUI Version 2.096Citazione:
Swizzy's xeBuild GUI Version 2.096
----------------------------------
****** If you find a bug, let me know! you can reach me on: swizzy@xeupd.com ******
NOTE: I did NOT create xeBuild! i merely made a frontend/GUI for it!
NOTE: This is the official frontend/GUI for xeBuild, i have contacts with the team, but i cannot give you details about future features or how everything works.
NOTE: I take NO responsibility for damage to your console/files caused by your use of my program!
NOTE: If the program say something about "Unkown" when you check the nand this ussually means it is NOT supported! If you encounter a problem with a NAND that the GUI can't identify that's probably NOT a bug in the program, but rather unsupported versions...
================================================== ====================
Requirements - What you need to do have in order for this to work!
================================================== ====================
- Microsoft .NET Framework 2.0 or later
- Your CPUKey or network connection with your console ;) (when creating images other then ECC)
- A dump of your nand OR donor files OR a motherboard and a device that can dump the nand using nandpro
================================================== ====================
Overview - What it does
================================================== ====================
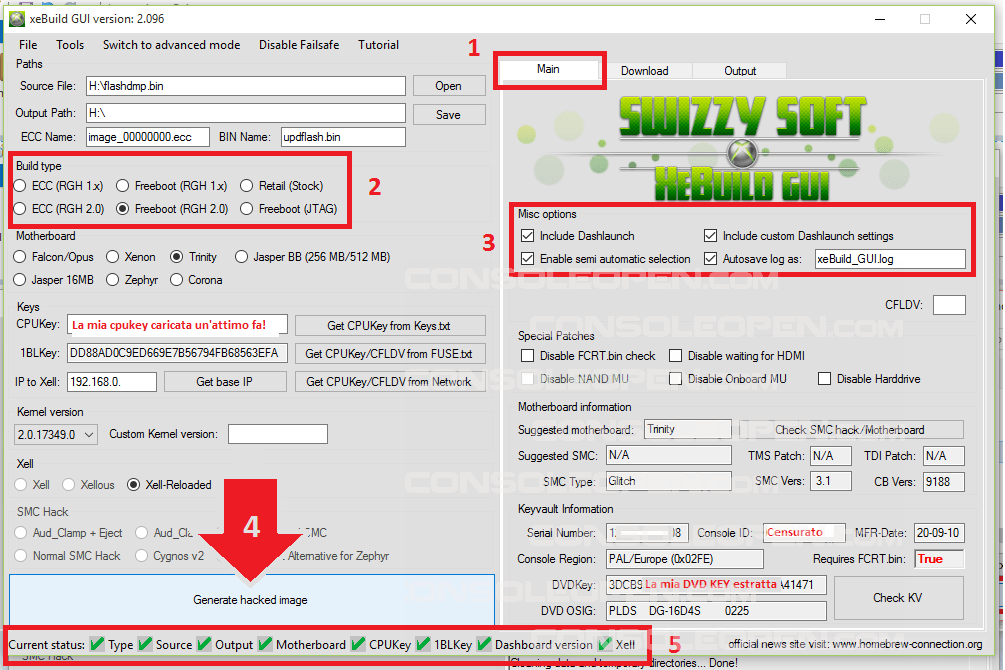
- This is a frontend/GUI for xeBuild, what it does is make it easy for you to select most options that you might need, such as Motherboard, SMC hack for freeboot, image type etc. etc.
- It is able to check what SMC hack you have previously used for JTAG it's also able to tell you what SMC version you have, and if it's a JTAG, Clean/Retail, Glitch or Cygnos patched SMC :)
- If you put any of these files next to the executable it'll use them automaticly:
SMC.bin - Custom SMC of your choice; ONLY USE THIS IF YOU KNOW WHAT YOU ARE DOING!!!!
kv.bin - donor keyvault; ONLY USE THIS IF YOU KNOW WHAT YOU ARE DOING!!!!
smc_config.bin - donor smc_config; ONLY USE THIS IF YOU KNOW WHAT YOU ARE DOING!!!!
Xell.bin - Custom Xell of your choice; ONLY USE THIS IF YOU KNOW WHAT YOU ARE DOING!!!!
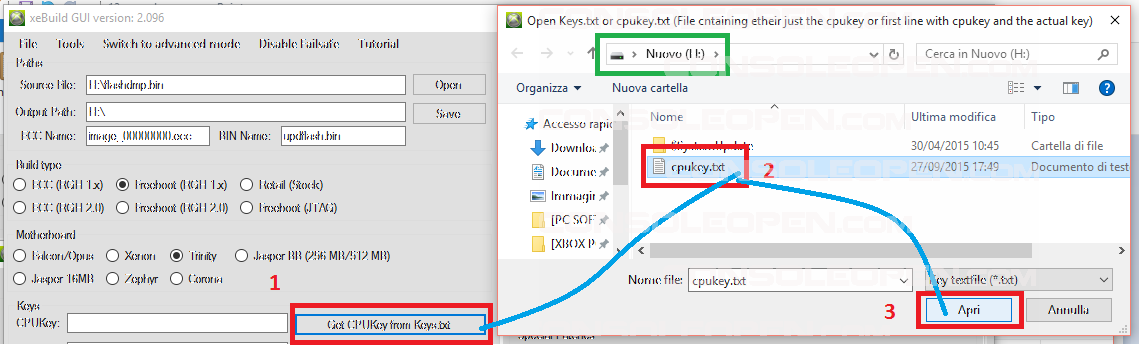
cpukey.txt - It'll read first line of this file, if it starts with "cpukey" it'll read the last 32 characters from that line (removing any extra spaces) otherwise it'll read the first 32 characters of that line (removing any extra spaces)
FUSE.txt - It'll parse it as if it was saved from Xell using network...
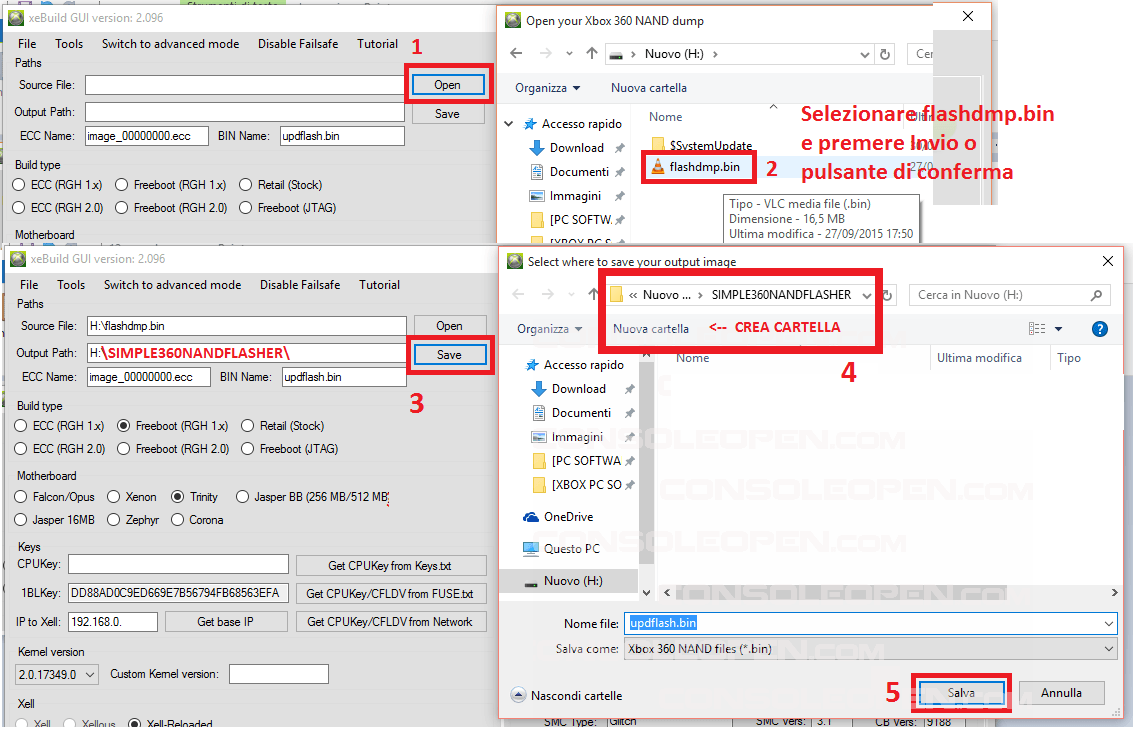
flashdmp.bin - It'll load this as source nand ;)
Default.xml - It'll load any preset settings from this file ;)
nandpro.xml - It'll load any nandpro settings from this file ;)
options.ini - It'll load any custom settings from this (for xeBuild)
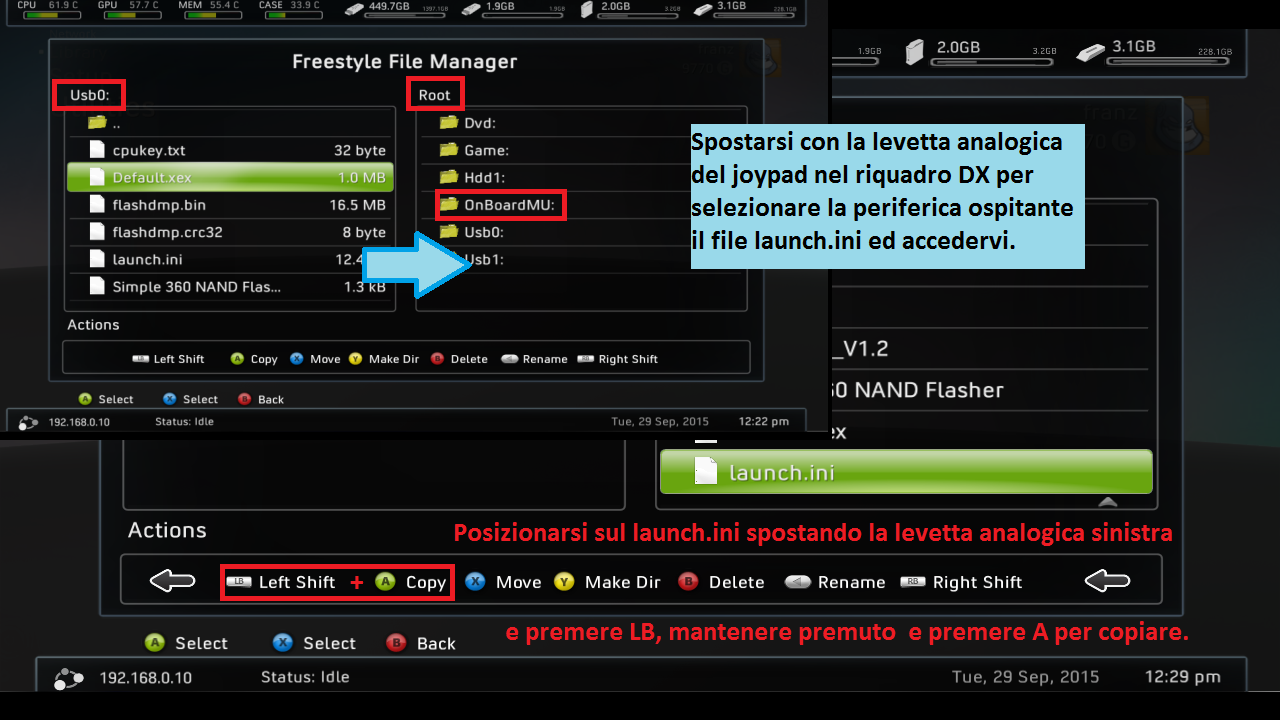
launch.ini - Settings for Dashlaunch, if you choose to use this setting it'll include this file in the generated image ;)
================================================== ====================
Notes about build types/image types
================================================== ====================
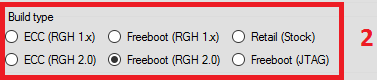
First of all, there are 3 types of hacks, first one is called "JTAG"
or "SMC-JTAG" it's the first version of the JTAG hack for Xbox 360
the requirements to use this type of hack is:
- Dashboard may NOT be higher then 2.0.7371.0
- The console may NOT be manufactured or have been to a repaircenter
after 2009-06-xx~ there are some exceptions to this, but most of the
consoles after this has new CB versions which have "fixed" the hack
Valid CB versions for JTAG includes:
* Xenon: 1888, 1902, 1903, 1920, 1921
* Zephyr: 4558, 4571, 4580
* Falcon: 5761, 5766, 5770
* Jasper: 6712, 6723
Second hack is called "RGH" or "Reset Glitch Hack" it was made by GliGli
and Tiros, This hack works for almost all versions of consoles, however
phat consoles have had this "fixed" by getting split CB versions, the
requirements here are quite simple:
- If you have a "phatt" console (non-slim) it may NOT have a dashboard above
2.0.14699.0 because after this it'll have the new CB versions and require the
new RGH 2.0 hack
Valid CB versions for RGH includes:
* Xenon: 1923, 1940, 7375
* Zephyr: 4578, 4579
* Falcon: 5771
* Jasper: 6750, 6751
* Trinity: 9188, 9230, 9231
Third and last hack is called "RGH 2.0", it was made by Team-Xecuter and
stolen/leaked to Team Squirt360 and released, it works something similar
to RGH but still a little different, this supports updated phatt consoles
and will probably support any newer dashboard, this type will NOT work with
a console updated to 15572 or above :(
since v 2.08 of xeBuild GUI files for Corona are also included and the info
below has been updated...
Valid CB versions for RGH 2.0 includes:
* Zephyr: 4559, 4560, 4575, 4577, 4561, 4562, 4569, 4574
* Falcon: 5772, 5773, 5774
* Jasper: 6752, 6753, 6754
* Corona: 13121, 13180, 13181, 13182
================================================== ====================
Notes about building retail/devkit images
================================================== ====================
Retail images can be built using this gui, it includes common retail
SMC's i've extracted myself, i make no form of garantuee that these
are safe to use for your console, some machines might not like the
bootloaders etc. which are used by default...
If you want to create devkit images you will need to find the files for
it on your own, and you will also need to select custom version because
they're different from the normal dashboard. i've limited this type
of images to advanced due to normal users not having a devkit in the
first place, only devs should have one and devs should be advanced ;)
Please read the xeBuild readme for more details about devkit building...
================================================== ====================
Notes about LDV
================================================== ====================
There are 3 ways you can get your LDV value:
1. Use Xell and manually count the ammount of "f" on fusesets
07 and 08, the total here is your LDV value.
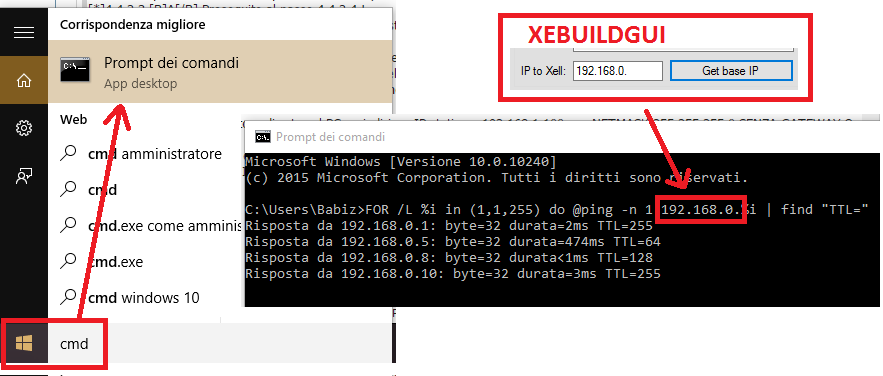
2. Use Xell and a network connection, doing this the app can
read fusesets for you and read cpukey aswell as check what ldv your
Xbox 360 should have automaticly for you (this option also sets both)
3. Use 360 Flash Dump Tool and check which value is the highest, this
is the one you will want to be using
Normally (if you have a good dump that does NOT include data from
.ECC file created using RGH python script) xeBuild should be able
to extract this value on it's own, if it can't just follow the
instructions above... if you don't understand these instructions,
ask google!
================================================== ====================
Notes about FCRT patches
================================================== ====================
This patch removes the need for FCRT.bin in nand, however, it will
NOT work for everyone, it's been disabled in the default configuration,
and should stay disabled if you are using a machine with a Liteon DG16-D5S
FW: 1175, it's been confirmed by me that it doesn't work on these drives
all others i've tested has worked just fine, however it can still be a
problem for you to have this activated, disable it if games don't work
from discs (if you use this feature!)
================================================== ====================
Other things you need to know about that don't fit in the changelog
================================================== ====================
**************
* KNOWN BUGS *
**************
- If you have a badblock @ block 1 the app will NOT be able to extract/check your KV
if you want it to do this for you, you'll have to manually remap it to fix your nand
i'll be adding support for doing this automatically when needed later on ;)
- Sometimes when you start a download for the first time the app may stand still for a while
doing nothing... i have no idea why this is happening atm, only had it happen to a friend of
mine but haven't been able to reproduce it myself and therefor i cannot find the reason for
this to happen, i'm looking for what is causing it, if you experience this, let me know and tell
me about your computer, what connection you have, what OS you have etc. all this will help me
if it's because of connections i can't do anything about it ;)
*******************************
* Features beeing worked upon *
*******************************
- A Full Updater, i will be making a update program for xeBuild GUI which will be capable of checking for
and downloading new files/versions for you, i had one in previous code base but decided not to include it
here because it needs more work, and i've also considerd the possiblity of replacing current xebuild GUI version
which would require the prog to NOT be running, thus an external updater would be required, i'll be working
around that idea and hopefully release an updater soon :)
- Badblock management, i'll be working on detecting and dealing with badblocks which could cause a problem with
some features, such as dumping/decrypting KV to check various values in it
================================================== ====================
Credits - Thanks to:
================================================== ====================
- A HUGE thanks to: cOz and Razkar - Thanks for everything, without you guys i wouldn't have been able to make this app into what it is! i owe you bigtime! ;)
- Team Xecuter - Thanks for figuring out and releasing info about glitching Xenons and RGH 2.0!
- GliGli & Tiros - Thanks for figuring out and releasing RGH in the first place! :D
- BestPig - Thanks for releasing the source for your FCRT.bin extractor, it helped me out alot! ;)
- Blackaddr - Thanks for your SMC_Utility it's awesome! :D
- Tiros - Thanks for nandpro! :D
- nitram - Thanks for the updated build.py
- RF1911 - Thanks for your help with extracting smc_config :)
- LegendaryFire - NandApi : http://www.team-hq.com/index.php?title=NandApi Thanks for making this! it really helped me out with the keyvault stuff :)
- Jack Nepacha - Making my new icons and other graphical stuff thanks mate ;)
- Aioros - Making the latest Icon/Logo
- Anyone else that has helped me with anything such as tests, bug finding and such that is not mentioned above, THANK YOU! without testers this app would be pretty much useless compared to the other GUI versions out there ;)
- Guida Realizzata per ConsoleOpen.com -
Un ringraziamento speciale a Swizzy per aver messo a disposizione il suo CRC32Gen e per la sua disponibilità nell'aver seguito questa guida illustrata facendomi notare alcune inesattezze (prontamente corrette :D )
Il frontend XEBUILDGUI di Swizzy, il quale comprende XeBuild è disponibile per un'utilizzo libero in base ai termini specificati nella licenza di XeBuild.[/SIZE]
license.txt Xebuild 1.15 del 30/04/2015:Citazione:
As requested by the authors, the various licenses of the open source hash and crypt libraries is provided here
with the application distribution. Note there are two (2) citations provided here, one for RC4/SHA and one for AES.
================================================== =================================================
AES:
================================================== =================================================
---------------------------------------------------------------------------
Copyright (c) 1998-2008, Brian Gladman, Worcester, UK. All rights reserved.
LICENSE TERMS
The redistribution and use of this software (with or without changes)
is allowed without the payment of fees or royalties provided that:
1. source code distributions include the above copyright notice, this
list of conditions and the following disclaimer;
2. binary distributions include the above copyright notice, this list
of conditions and the following disclaimer in their documentation;
3. the name of the copyright holder is not used to endorse products
built using this software without specific written permission.
DISCLAIMER
This software is provided 'as is' with no explicit or implied warranties
in respect of its properties, including, but not limited to, correctness
and/or fitness for purpose.
---------------------------------------------------------------------------
Issue Date: 20/12/2007
================================================== =================================================
RC4/SHA:
================================================== =================================================
Copyright (C) 1995-1997 Eric Young (eay@cryptsoft.com)
All rights reserved.
This package is an SSL implementation written
by Eric Young (eay@cryptsoft.com).
The implementation was written so as to conform with Netscapes SSL.
This library is free for commercial and non-commercial use as long as
the following conditions are aheared to. The following conditions
apply to all code found in this distribution, be it the RC4, RSA,
lhash, DES, etc., code; not just the SSL code. The SSL documentation
included with this distribution is covered by the same copyright terms
except that the holder is Tim Hudson (tjh@cryptsoft.com).
Copyright remains Eric Young's, and as such any Copyright notices in
the code are not to be removed.
If this package is used in a product, Eric Young should be given attribution
as the author of the parts of the library used.
This can be in the form of a textual message at program startup or
in documentation (online or textual) provided with the package.
Redistribution and use in source and binary forms, with or without
modification, are permitted provided that the following conditions
are met:
1. Redistributions of source code must retain the copyright
notice, this list of conditions and the following disclaimer.
2. Redistributions in binary form must reproduce the above copyright
notice, this list of conditions and the following disclaimer in the
documentation and/or other materials provided with the distribution.
3. All advertising materials mentioning features or use of this software
must display the following acknowledgement:
"This product includes cryptographic software written by
Eric Young (eay@cryptsoft.com)"
The word 'cryptographic' can be left out if the rouines from the library
being used are not cryptographic related :-).
4. If you include any Windows specific code (or a derivative thereof) from
the apps directory (application code) you must include an acknowledgement:
"This product includes software written by Tim Hudson (tjh@cryptsoft.com)"
THIS SOFTWARE IS PROVIDED BY ERIC YOUNG ``AS IS'' AND
ANY EXPRESS OR IMPLIED WARRANTIES, INCLUDING, BUT NOT LIMITED TO, THE
IMPLIED WARRANTIES OF MERCHANTABILITY AND FITNESS FOR A PARTICULAR PURPOSE
ARE DISCLAIMED. IN NO EVENT SHALL THE AUTHOR OR CONTRIBUTORS BE LIABLE
FOR ANY DIRECT, INDIRECT, INCIDENTAL, SPECIAL, EXEMPLARY, OR CONSEQUENTIAL
DAMAGES (INCLUDING, BUT NOT LIMITED TO, PROCUREMENT OF SUBSTITUTE GOODS
OR SERVICES; LOSS OF USE, DATA, OR PROFITS; OR BUSINESS INTERRUPTION)
HOWEVER CAUSED AND ON ANY THEORY OF LIABILITY, WHETHER IN CONTRACT, STRICT
LIABILITY, OR TORT (INCLUDING NEGLIGENCE OR OTHERWISE) ARISING IN ANY WAY
OUT OF THE USE OF THIS SOFTWARE, EVEN IF ADVISED OF THE POSSIBILITY OF
SUCH DAMAGE.
The licence and distribution terms for any publically available version or
derivative of this code cannot be changed. i.e. this code cannot simply be
copied and put under another distribution licence
including the GNU Public Licence.
Fonti del glossario e delle citazioni:
GUIDE: How to update your JTAG/RGH Xbox 360
kernel/dashboard using xeBuild GUI
GXArena FW Repo
Free60
Pagina iniziale di Xbox Italia | Console, Bundle, Giochi e Supporto | Xbox.com
https://it.wikipedia.org/wiki/Pagina_principale
HelloQuizzy.com: Online Dating Quiz, Personality Quiz, Personality Test, IQ Test, Free IQ Test, Psychology Test
Command Line Kung Fu: Episode #6 -- Command-Line Ping Sweeper
Allegato 19716
PARTE 7: Domande frequenti
Infine ecco una raccolta di domande frequenti che possono aiutare nella risoluzione dei problemi comuni con l'utilizzo della procedura di aggiornamento descritta, parte in aggiornamento continuo , relazionate alle domande più strampalate postate dalla community e trovate nel forum:
(La prima è di riscaldamento, non offendetevi)
D: Aiuto non ho capito nulla!!
R: E' impossibile!! Prova a rileggere dall'inizio.